
Manage users
 The user training video Subject Outlines Admin shows you how to add new subject coordinators, amend subject access, run reports and send emails to users via Subject Outlines.
Note: Only Admin Editors can manage users, and they can only assign Editor or Reviewer roles. If a user needs Admin Editor access, it needs to be provided by APO CIS. Admin Editors can amend the role of or add additional subjects to existing users.
To manage users, click the [Admin] link in the left navigation, and choose the 'Users' option or click on the 'Manage users' link on the main screen.
A user search screen is displayed. You can return to the search screen at any time using the 'Users' option in the left navigation or by clicking the Search tab.
Search
New
Edit
Bulk change role
Current Subjects
Add Subjects
Search
Note: You can only search for existing users. To create a new user, click the New tab instead (see below for details).
The search options available for existing users are:
- search all existing users in your faculty by typing a name or staff number in the search box
- search all existing users by teaching responsibility, e.g. get a list of all users assigned to the 'Accounting' teaching responsibility
- search all existing users by role, e.g. get a list of all subject coordinators in your faculty.
Choose a single search criteria or a combination of search criteria and click the [Search] button to retrieve the list of users.
Note: You can click the [Search] button without any other search criteria being entered and the entire list of users in your faculty (i.e. SO Admins and SO Coordinators) will be displayed. This is particularly important because most subject coordinators will not have a faculty assigned to them in the system (instead they will have individual subjects assigned to them). Therefore if you search for users by faculty or teaching area, the search result will not include these subject coordinators.
The search result will appear as a list with four columns and two buttons:
The four columns are:
- Number (the staff number)
- Name
- Role
- Faculty (will be blank unless the user has been assigned to a faculty or a specific teaching responsibility).
The up and down arrows beside the column headings order the list in ascending or descending order by that column. For example, if you searched for all users in your faculty by clicking the [Search] button without choosing any search criteria, the complete list of your faculty users will be returned. By default, they will be sorted alphabetically by first name. To reorder the list so role types are grouped together, click the 'Role' heading.
The two buttons are:
- Edit (to amend the access to a user's subjects): clicking this button will take you to the Edit tab (see below)
- Delete (to delete a user from the system).
New
To add a new user, click the New tab. Type in the user's staff number and click the [Add] button. The user's details will be drawn into the system from LDAP. You will be automatically taken to the Edit tab and a message will be displayed saying, 'Account created. Please update role and faculty.'
Note: Only staff with UTS staff IDs can be given access to the system (which means, for example, part-time staff need a UTS staff ID before they can access the system).
Edit
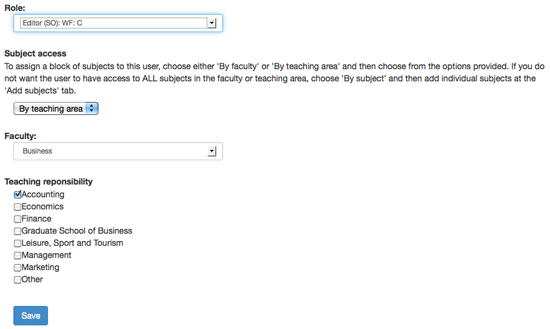
Choose (if a new user) or amend (if an existing user) the required role from the drop-down list, either 'Editor (SO)' or 'Editor (SO): WF: C' (both these roles are subject coordinator roles; the 'WF: C' in the role name indicates that the role has access to workflow (WF)).
Subject coordinators can be assigned subjects in blocks (by faculty or teaching responsibility) or as individual subjects. Under 'Subject access' choose one of the three options in the drop-down: 'By faculty', 'By teaching area', or 'By subject'.
To assign a block of subjects to this user, choose either 'By faculty' or 'By teaching area' and then choose from the options provided. If you do not want the user to have access to ALL subjects in the faculty or teaching area, choose 'By subject' and then add individual subjects at the 'Add Subjects' tab (see below).
For example, to assign all Accounting subjects to a course director in the Faculty of Business:
- under 'Role', choose either 'Editor (SO)' or 'Editor (SO): WF: C'
- Under 'Subject access', choose 'By teaching area'
- under 'Faculty', choose 'Business'
- under 'Teaching responsibility' include a tick in the checkbox beside 'Accounting' only
- click the [Save] button.
Bulk change role
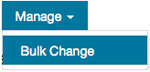
To change the role of a group of users at the one time (e.g. all subject coordinators in the faculty from 'Editor (SO)' (i.e. without workflow) to 'Editor (SO): WF: C' (i.e. with workflow), go to Subject Outlines / Admin /Users. On the Manage tab, choose 'Bulk change' from the drop-down options.
Select the criteria from the three drop-downs (i.e. 'Faculty' (only your faculty and its teaching areas are displayed), 'Old role', 'New role' (only roles you have access to assign are displayed).
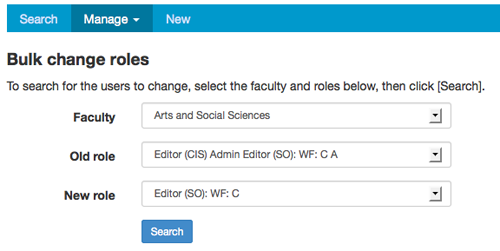
Click the [Search] button. The list of users matching the 'Faculty' and 'Old role' criteria is returned.
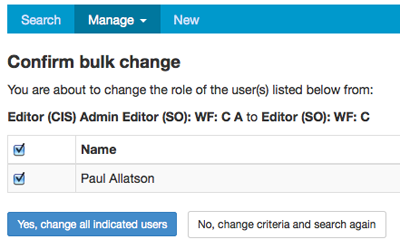
To change these users to the specified 'New role' criteria, click the [Yes, change all indicated users] button. You can amend the list of users to change by either un-checking the checkbox beside the name or by clicking the [No, change criteria and search again] button and amending the search criteria.
Current Subjects
To see what subjects a user can currently edit, first find the user at the Search tab. Once found, click the [Edit] button beside their name. Click the Current Subjects tab and the list of subjects will be displayed:
- remove all subjects by clicking the [Remove all subjects] button
- remove one or more subjects by ticking the checkbox beside the subject(s) name and clicking the [Remove selected] button
- add new subjects by clicking the Add Subjects tab (see below)
- 15 subjects are displayed per page view; flick through the pages by clicking the page number box or [Prev] [Next] box at the top of the screen.

Add Subjects
To add subjects individually to a user, first find the user at the Search tab. Once found, click the [Edit] button beside their name. Click the Add Subjects tab and subject search options will be displayed.
To find a single subject, type the subject code or name in the search box and click the [Search] button.
To find a set of subjects, choose a teaching responsibility from the faculty/teaching responsibility drop-down and click the [Search] button.
Once found, tick the checkbox beside the subject(s) you want to add and click the [Add] button. To select all found subjects, tick the checkbox in the heading row and then click the [Add] button.
Note: If the user already has access to a subject, the checkbox will be greyed out and you will be unable to tick it. There is no limit to the number of subject coordinators that can be assigned to an individual subject.