
Create PDFs
 The user training video Subject Outlines: Preview/Generate PDF also shows you how to generate a PDF via the Preview/Generate PDF tab.
After finding the subject using the Search tab, you create subject outline and faculty PDFs by choosing an option on the Preview/Generate PDF tab dropdown.

Show existing PDFs
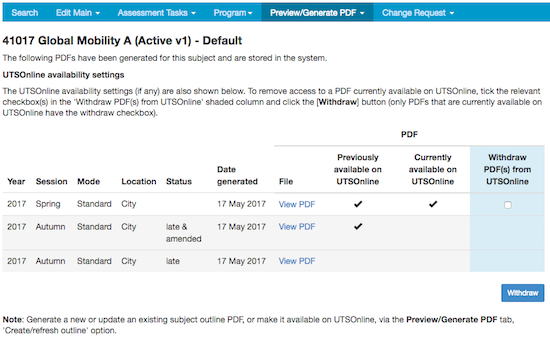
Choosing the 'Show existing PDFs' option on the Preview/Generate PDF tab dropdown provides a complete list of PDFs already generated for the subject and stored in the system, and identifies if the PDF is available via Canvas.
The Canvas availability settings shown are:
- Previously available on Canvas: the PDF has at some point been made available on Canvas.
- Currently available on Canvas: the link to the PDF is currently activated on Canvas (as long as the subject site has been created in Canvas for that session).
Withdraw PDF(s) from Canvas
To remove access to a PDF currently available on Canvas (because, for example, you clicked [Yes] in error, when you should have clicked [No, I'm still working on it]), tick the relevant checkbox in the 'Withdraw PDF(s) from Canvas' shaded column and click the [Withdraw] button (only PDFs that are currently available on Canvas have the withdraw checkbox).
If there are no PDFs stored for the subject, the message 'No PDFs have been generated for this subject' will be displayed.
Create/refresh outline
To create a subject outline PDF, choose the 'Create/refresh outline' option on the Preview/Generate PDF tab dropdown.
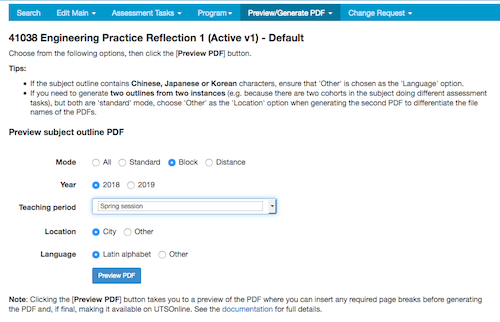
You then go to an offering details screen where you need to select from various offering options (the options chosen form the name of the subject outline PDF and the 'Delivery' information specified on the PDF, see PDF naming conventions for details):
- choose the mode from the options available, e.g. 'Standard' ('All' should be chosen if there is only one instance of the subject)
- specify the year that the subject outline is being generated for, e.g. '2016'
- specify the teaching period that the subject outline is for, e.g. 'Autumn session' (the dropdown list includes the main and short teaching periods)
- specify the location that the subject outline applies to, e.g. 'City' or 'Other' ('Other' should be chosen if, for example, the the subject is offered by distance)
- if the subject outline contains Chinese, Japanese or Korean characters, choose 'Other' as the 'Language' option; 'Latin alphabet' is the default option chosen.
The relationship between the PDF file name and Canvas
The PDF file name needs to match the subject's Canvas site or the link to the subject outline PDF from Canvas won't work.
For example, if the link to the subject outline from Canvas subject site is:

the subject outline PDF needs to be generated in CIS so the PDF file name matches the Canvas site name, which means the following options need to be chosen at the point of generation:
which will generate the following PDF file:
2018_Spring_41038_v1_block_city_23-7-18.pdf
Tips
- If you need to generate two outlines from two instances for the same teaching session (e.g. because there are two cohorts in the subject doing different assessment tasks), but both are 'standard' mode, choose 'Other' as the 'Location' option when generating the second PDF to differentiate the file names of the PDFs.
- Selecting 'Mode=All' labels the PDF as 'standard'. It should only be used when there is one instance of a subject. If multiple instances exist, use the 'standard', 'block' or 'distance' options, as appropriate.
Once all options are set, click the [Preview PDF] button.
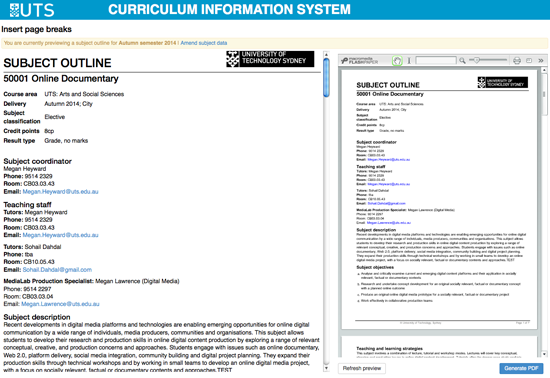
Insert page breaks
After you click the [Preview PDF] button, you are taken to a split screen with CIS data on the left pane and the PDF representation on the right pane.
You can now preview the on-screen PDF and insert page breaks as required (to override the system-created page breaks) before you generate the PDF (by clicking the [Generate PDF] button) for checking purposes (choose the [No, I'm still working on it] button when asked if it's ready for Canvas) or as the final version to be sent to Canvas (choose the [Yes] button when asked if it's ready for Canvas).
Note: if the text in the PDF has dramatically reduced in size it's probably because long URLs have been included.
Preview the PDF on the right pane by scrolling through it (using the scroll bar attached to the right pane, not the browser's scroll bar).
If you find a spot that needs a page break, find the corresponding location on the left pane. To insert a page break, click on the paragraph or heading below where you want the page break to occur, i.e. to move a heading to the next page, click on the heading to insert a page break before it. (Tip: you can generate draft PDFs without inserting any page breaks; this will enable you to view the data and finalise it first; once the data is final you can then insert the page breaks and generate the final PDF.)
A yellow line will appear where the page break will occur. Click the [Refresh Preview] button on the right pane (the PDF representation) to insert and view the page break you've just created.
Continue previewing the PDF on the right pane, inserting more page breaks on the left pane and refreshing the preview after each one on the right pane as required.
To remove a created page break, click on it (i.e. the yellow line) on the left pane (it will disappear) and then click [Refresh Preview] on the right pane.
Note: any page breaks you insert at the preview and generate PDF stages are only held for that generation. This means, for example, if you generate a PDF with five pages breaks and then realise you need to add another one, when you go back to regenerate the PDF you will have to re-add the previous five page break plus the one you missed. It is therefore better and more time efficient to ensure that your data is final before inserting page breaks and generating the final PDF.
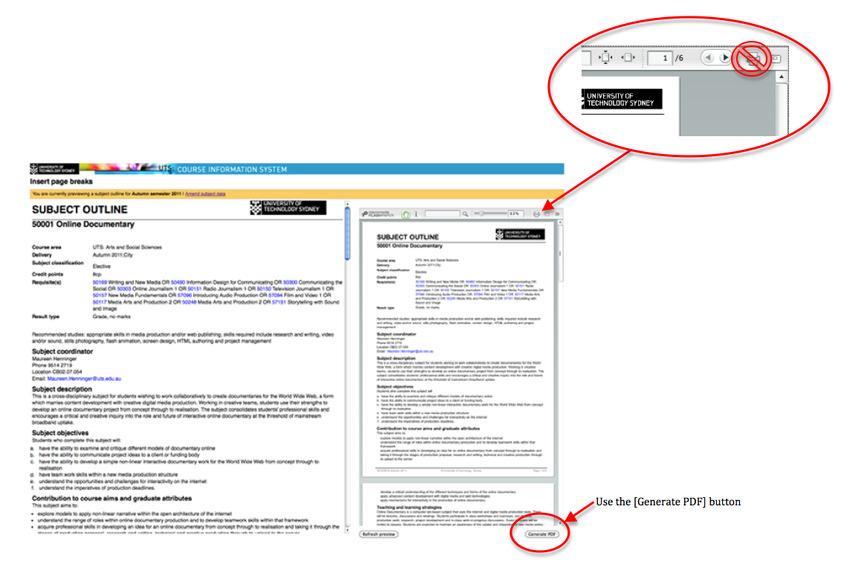
Printing warning: do not use the print button at the top right of the right pane to print a copy of the PDF. It won't provide the desired results. Instead use the [Generate PDF] button (bottom right of window) (see screenshot below).
Generate PDFs and make available in Canvas
Once the 'insert page breaks' process is complete, click the [Generate PDF] button on the bottom right corner of the right pane.
You will next see a dialogue box, asking 'Is this the final Subject Outline PDF?'.
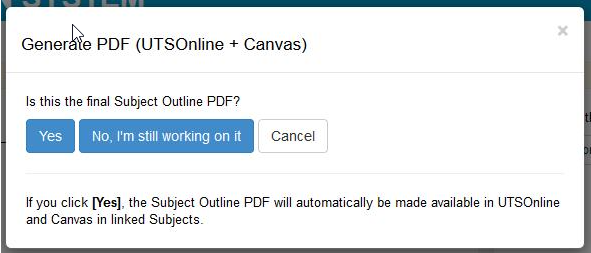
The dialogue box options are:
- Yes: the Subject Outline PDF will be generated and stored in CIS: It will be automatically made available to Canvas and the link to the PDF in Canvas will be activated (once the subject site has been created in Canvas for that session). In Canvas, 'Subject Outline' will show as an item on the Canvas subject menu just after the Home menu item.
- No, I'm still working on it: the PDF will be generated and stored in CIS but will not be available via Canvas. Note: Where an earlier PDF is available on Canvas it will be removed.
- Cancel: the generate PDF process will be cancelled and you will return to the previous screen.
Note: Before the on-time cut-off date, if you generate a PDF, make some data changes to the same instance of the subject and then regenerate the PDF with the same offering details, the latest PDF will overwrite the existing PDF (ensure you choose the [No, I'm still working on it] button until the PDF is final and ready for Canvas). This means you can regenerate the PDF as often as needed, making iterative changes up until the on-time cut-off date. Where an earlier PDF has been made available on Canvas, that version continues to be stored at Show existing PDFs, with the most recent version appearing at the top of the list.
Troubleshooting: If you have generated the subject outline PDF and made it available on Canvas but the link from Canvas doesn't work, it may be because the PDF file has been named incorrectly. The PDF file name and Canvas subject site name need to match.
Withdraw the PDF from Canvas
If you've clicked [Yes] in error, when you should have clicked [No, I'm still working on it], you can withdraw the PDF from Canvas via the Preview/Generate PDF tab, 'Show existing PDFs' option.
CIS and Canvas integration
The following is brief information about how Canvas and CIS are integrated. Further details about the integration between CIS and Canvas are available here.
- Subject sites in Canvas are now automatically created for each of the main teaching sessions (i.e. Autumn, Calendar B Autumn, Spring, Calendar B Spring, Summer). You do not need to request this anymore.
- When the subject site is created in Canvas, a link to the 'standard' mode PDF is also created and displayed:
- PDF generated: If you have generated a standard mode PDF in CIS and made it available in Canvas, clicking the link in the Canvas subject site opens/downloads the subject outline PDF.
- PDF generated, but withdrawn: If you have generated a standard mode PDF in CIS and made it available in Canvas, but then used the 'withdraw' function in CIS, clicking the link in the Canvas subject site triggers a pop-up warning message: 'This subject outline is being revised. Please check back soon, or contact the subject coordinator.'
- PDF not generated: If you have not yet generated a standard mode PDF in CIS, clicking the link in the Canvas subject site triggers a pop-up warning message: 'This subject outline is not yet available. Please check back soon, or contact the subject coordinator.'
- Subject outline PDFs can be generated in CIS as 'Standard', 'Block', or 'Distance' mode and 'City' or 'Other' location. The link displayed in Canvas is for the 'Standard' 'City' PDF (as this is what most PDFs are). If you have generated a 'Block' or 'Distance' PDF, or a PDF with a location of 'Other' and chosen to make it available on Canvas, the link to it in Canvas appears the following day.
- To be able to see the subject outline PDF link in Canvas, you need to be in 'Edit Off' mode.
- If you generate a subject outline PDF (either in CIS or elsewhere) and then manually upload and attach it to the Subject Outline section of Canvas, clicking the link triggers a 'Not found' error message. Therefore you should not manually upload the subject outline PDF, but instead you should generate it via CIS: Subject Outlines and use the 'make it available on Canvas' function.
Download PDFs
You can download a copy of the PDF to your computer, print a copy, and circulate it to faculty staff for checking and approval either via the 'Generate PDF' confirmation screen or via the 'Show existing PDFs' screen.
If your faculty uses the inbuilt workflow function, you can also generate a draft PDF incorporating the latest changes via CI/Workflow/PDF or SO/Change Request/Preview PDF.
Archiving PDFs in TRIM
All PDFs (whether on-time, late or amended) are copied to TRIM (the University's record system) for permanent storage.