Assessment Tasks tab
 The user training video Subject Outlines: Assessment Tasks also shows you how to manage assessment task data via the Assessment Tasks tab.
Manage tasks
- Log in to Subject Outlines
- Go to the subject/instance
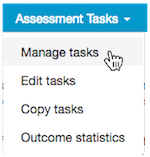
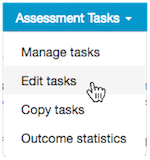
- Choose the Assessment Tasks tab, and click 'Manage tasks'
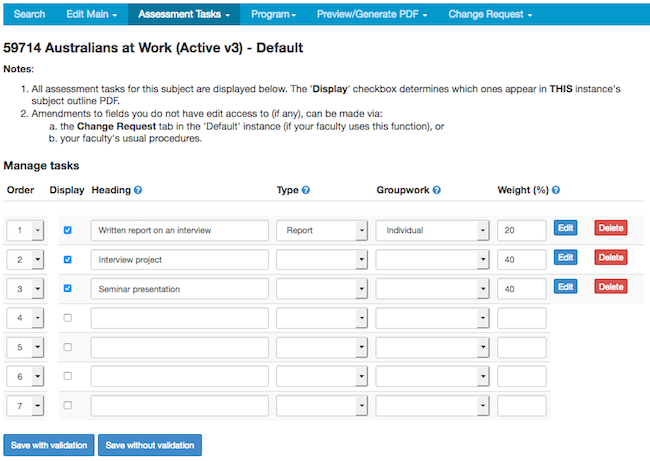
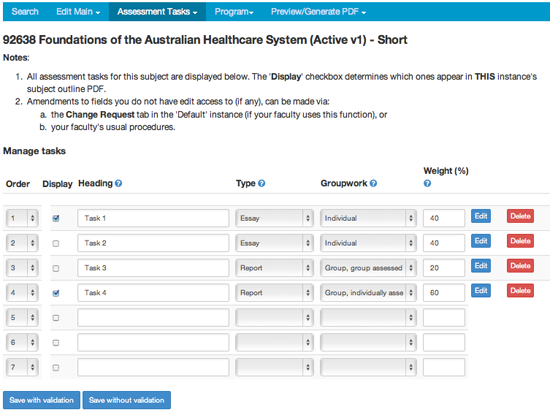
The Manage tasks screen shows the complete set of the subject's assessment tasks. All users have access to the Display checkbox, which is used to determine which assessment tasks appear in the subject outline PDF (see full details below).
Users with admin level access can edit the 'Heading', 'Type', 'Groupwork', and 'Weight' fields for each assessment task; and reorder, delete and create new tasks via the Manage tasks screen.
Users without edit access to these fields can instead request changes via the Change Request tab, 'Manage tasks' in the 'Default' instance (if your faculty uses this function), or your faculty's usual procedures.

Warning: After making any changes, you must click the [Save with validation] or [Save without validation] button before leaving the screen or any changes made will be lost.
The procedures for updating these fields is the same whether it is done via the Assessment Tasks tab, Manage tasks or the Change Request tab, Manage tasks, as follows:
- Create a new assessment task by typing the details in one of the blank task rows; do not leave blank rows between tasks (there is a maximum of seven tasks)
- Reorder tasks by choosing an order number from the drop-down list in the 'Order' column; reordering a task via one instance reorders it in all instances. Note: Reordering can only be done via the Assessment Tasks tab, 'Manage tasks', not via the Change Request tab, 'Manage tasks'.
- Heading: amend the assessment task heading by typing in the data in the 'Heading' column
- Type: choose a type (i.e. 'Essay', 'Report', 'Exam', 'Test', etc.) from the drop-down list in the 'Type' column, if required
- Groupwork: choose 'Group', 'Individual', or 'Combined', etc., from the drop-down list in the 'Groupwork' column, if required
- Weight (%): amend the percentage weighting by adding a number in the 'Weight (%)' column; the value must be a number only (no percentage symbol).
- A task can have zero (0) weight.
- If a task weight is specified as '0', the following standard statement appears in the Subject Outline PDF: 'Mandatory task that does not contribute to subject mark'.
- If you do not wish to assign a specific weight to a task, e.g. because the weight is negotiated between the student and the supervisor, then leave the weight field blank and add the details about the make-up of the weight in the assessment task in the 'Further information' field, e.g. 'Negotiated weight may not exceed 65%.'
Note: leaving the weight field blank will not cause a validation error, but will cause errors in graduate attribute reporting, both in reports and in the outcome statistics pie charts. - The 'Further information' field is also used for any extra detail required about an assessment task weight, e.g. 'Weight distributed as follows: individual work 10%; group work 10%.' In this case, the figure '20' would be entered as the overall weight for the assessment task. Validation can be applied to the accumulated weight of all assessment tasks:
- If the values for all assessment tasks add up to '100', then the [Save with validation] button will be active.
- If the values for all assessment tasks do not add up to '100', an on-screen warning will appear: 'Total weight is not 100' and the [Save without validation] button will be active.
- All other fields: amend all other fields (i.e. 'Intent', 'Task', 'Length', 'Assessment criteria', 'Due date', 'Further information' and 'Criteria linkages') by clicking the [Edit] button beside the task you want to amend (see 'Edit tasks' below)
- Delete an existing task via the Assessment Tasks tab, 'Manage tasks':
- click the [Delete] button beside the relevant task (Warning: deleting a task via one instance deletes it from all instances)
- you'll get a warning message; click the [Yes, delete] button to continue, or the [No, cancel] button to stop (Warning: this cannot be undone).
- Delete an existing task via the Change Request tab, 'Manage tasks':
- simply delete all the text in the row
- don't worry about creating a blank row because of a deletion; blank rows are automatically removed during the approval process.
Data will appear in red if it is invalid. If should be fixed before Subject Outline PDF generation, e.g. '20%' needs to be changed to '20' for it to be valid.
Display checkbox
The complete set of assessment tasks is displayed in every instance via 'Manage tasks'. If required, each instance of a subject can use a different sub-set of assessment tasks chosen from the complete set.
The instance's sub-set is specified by ticking tasks on or off using the 'display checkbox' on the Assessment Tasks tab, 'Manage tasks' screen.
Weight validation occurs within the instance on the ticked on tasks, so ticked on tasks must total 100.
Note:
- Re-ordering assessment tasks in one instance results in the re-ordering of assessment tasks in all instances (because you're reordering the complete set).
- Though the numbering of tasks in the subject outline PDF can vary between instances, depending on which tasks are ticked on in each instance, fields that do not differ across instances remains consistent across all instances. For example, if data in Task A (or the first row in 'Manage tasks') is edited in a Block instance, this will flow through to all instances where the first row is ticked on.
- Deleting a task via one instance deletes it from all instances. If you don't want to display a task in, for example, the Block instance, untick it in the Block instance rather than deleting it (because it may be ticked on in another instance and deleting it will remove it from the complete set and therefore from every instance).
Example 1: Default instance, using three tasks (i.e. three tasks are ticked on). Tasks total 100, i.e. 40+30+30, and therefore validate.
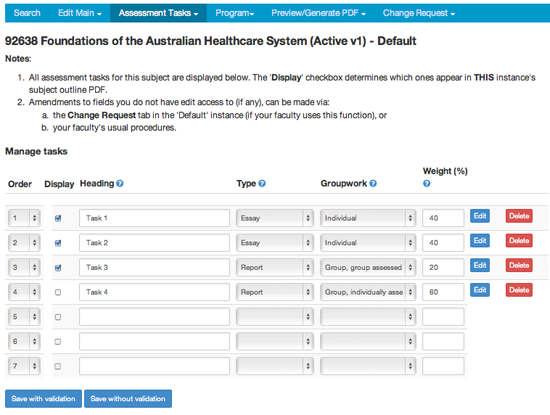
Example 2: Short instance, using two tasks (i.e. two tasks are ticked on). Tasks total 100, i.e. 40+60, and therefore validate.
Edit tasks
How do you know what you can edit?
Intent, Task, Length, Assessment criteria, Further information
Due date
Criteria linkages
Heading, Type, Groupwork, Weight (%), Reordering
Objectives
To edit the 'Intent', 'Task', 'Length', 'Assessment criteria', 'Due date', 'Further information' and 'Criteria linkages' for any assessment task:
- Log in to Subject Outlines
- Go to the subject/instance
- Choose the Assessment Tasks tab, and click 'Edit tasks'
All assessment tasks are displayed in numeric order via the 'Edit tasks' screen.
How do you know what you can edit?
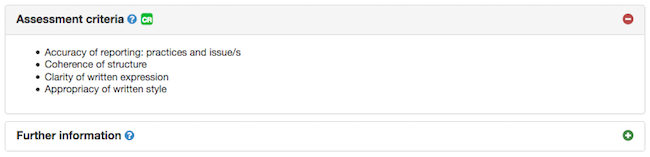
A green +/- icon (i.e.  or
or  ) in the top right-hand corner of the text box means you can edit the field. In addition to the green +/- icon, any field you can edit, when expanded, also turns yellow when you hover your mouse over it.

A red +/- icon (i.e.  or
or  ) in the top right-hand corner of the text box means you cannot edit the field. In addition to the red +/- icon, fields that you cannot edit also have a green change request icon (i.e.
 ![]() ) beside the field name. You can request changes to these fields via the Change Request tab in the subject's 'Default' instance (if your faculty uses the Workflow function), or via your faculty's existing approval processes.
) beside the field name. You can request changes to these fields via the Change Request tab in the subject's 'Default' instance (if your faculty uses the Workflow function), or via your faculty's existing approval processes.
Subject coordinators can only edit the following assessment task fields. All other changes need to be requested via the Change Request tab or via your faculty's usual procedures:
- Task
- Length
- Due date
- Further information.
Intent, Task, Length, Assessment criteria, Further information
To amend the data in the Intent, Task, Length, Assessment criteria, Further information fields: click on the field and amend the data as required. If you do not have edit access to a field, a change request icon ![]() is displayed beside the field name.
is displayed beside the field name.
Due date
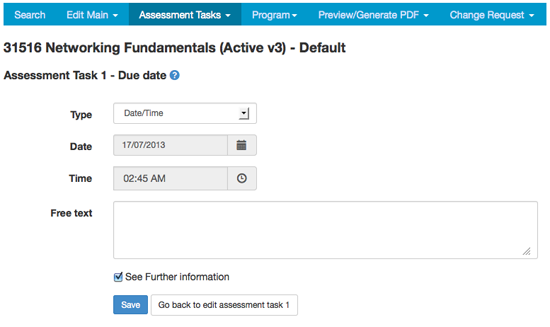
To amend the Due date click on it. You'll be taken to an edit screen where you can specify the due date type (i.e. 'Custom', 'Date', 'Date/Time', 'Week', 'Week range', 'In class', 'Exam period', 'Progressive', 'Negotiated', 'Practicum period'); depending on your choice, you'll then be able to specify the date, time, week, etc., and/or add free text data.
Ticking the checkbox beside 'See Further information', will add '; see Further information' to the data, e.g. if you choose 'Negotiated' and tick the checkbox, 'Negotiated; see Further information' will be displayed in the PDF. Any substantial further information about the due data can then be added to the 'Further information' field. Alternatively, you can use the 'Free text' field to add further information about the due date.
Click the [Save] button when finished. Return to the assessment task edit screen by clicking the [Go back to edit assessment task #] button.
Format
The 'Type' chosen for the due date determines the format that is used for its display in the Subject Outlines PDF, as indicated below:
- Date: Tuesday 31 October 2013
- Date/Time: 11.30am Tuesday 31 October 2013
- Week: Week 11
- Week range: Week 5 to Week 7
- In class: In class in Week 11; note that you can choose the 'n/a' option on the 'Week' dropdown and instead add data to the free text field, e.g. 'in Block 4'. This will display as 'In class in Block 4'
- Exam period: UTS Exam Period
- Progresssive: Not applicable
- Negotiated: Negotiated
- Practicum period: Practicum period
'Custom' can be used if you wish to add information to the 'Free text' field that cannot otherwise be captured using any of the other options on the 'Type' dropdown. If any of the options that specify actual due dates are chosen, the dates will eventually be automatically inserted in the corresponding row in the program table. The disadvantage of choosing 'Custom' and holding the data as free text rather than a specific type is that automatic population in the program table will not be possible.
Criteria linkages
The criteria linkages table (CLT) is where you indicate which of the subject's SLOs and parent study package (course or major) CILOs (if any) are addressed by the assessment task. Assessment criteria and weighting can also be held in the table.
The information provided in the CLT allows reports to be generated showing how the subject's assessment marks have been split between the various SLOs and CILOs. These reports can be accessed via the Assessment Tasks tab, 'Outcome Statistics'.
Only users with 'Admin Editor (SO)' as part of their role can edit the criteria linkages table. You can request changes to the criteria linkages table via the Change Request tab (if your faculty uses the Workflow function), or via your faculty's existing approval processes.
See also the information about displaying the criteria linkages table in the Subject Outline PDF.
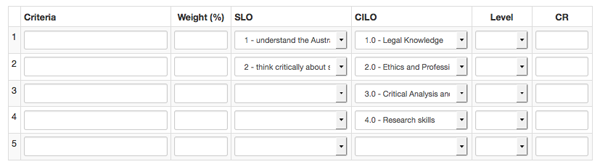
The CLT is made up of six columns and a checkbox:
- Treat the SLO and CILO columns as independent lists: this checkbox determines how the SLO and CILO data is used in the outcomes statistics piecharts (at SO / Assessment tasks and graduate attributes reports at CI / Graduate Attributes / Reports). By default it is ticked on.
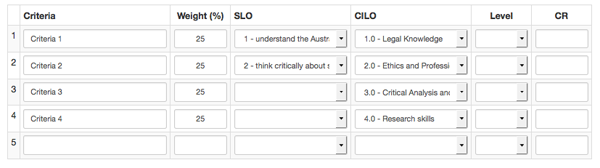
- Criteria: the assessment criterion expressed in words. This is a required field if data has been added to the 'Weight' field on the same row.
- Weight (%): the weight of the criterion as a percentage of the assessment task. This is a required field if data has been added to the 'Criteria' field on the same row. The [Auto-fill weight] button will give equal weighting to the criteria.
- SLO: the SLO that will be achieved when a student performs satisfactorily against the specified criteria or the assessment task as a whole. The SLO is chosen from a dropdown list, drawn from the 'Short descripion' data for the SLO (held in CI).
The dropdown includes a blank entry as not all criteria need to be linked to a SLO.
In Change Request, choose the blank option at the top of the SLO dropdown list to request to delete the SLO.
This is not a required field. - CILO: the parent study package's CILO that will be contributed to when a student performs satisfactorily against the specified criteria or the assessment task as a whole. The CILO is chosen from a dropdown list, drawn from the 'Short description' data for the CILO (held in CI).
The dropdown includes a blank entry as not all criteria need to be linked to a CILO.
In Change Request, choose the blank option at the top of the CILO dropdown list to request to delete the CILO.
This is not a required field. - Level: The level indicator can be used by those faculties that want to differentiate between the attainment of different levels of maturity in the achievement of intended learning outcomes. For example, '1' = 'novice level', '2' = 'experienced level', '3' = 'professional level'. This is not a required field. However, the CILO and level work together as a pair; the level data only refers to the CILO. Warning: If level data has been added against one CILO in the table, it needs to be added against all CILOs in the table. If left blank (when some CILOs have level data), the default value used in reports, but not displayed in the table, is '1'.
- CR: The competency reference can be used by those faculties where a professional accreditation body has codified required competencies. This is not a required field.
Warning: Changes made to graduate attributes data in CI can result in the disconnection of CILOs/SLOs in criteria linkages tables, activating a warning message to re-link data. Admin Editors can do this by clicking into the table and re-selecting the correct options from the dropdown menus. Subject coordinators (if they have access) can use the Change Request tab to request changes. Graduate attributes data can be copied between courses, i.e. when changing the parent course, to avoid disconnects. On request, APO CIS can provide a report showing which subjects have the warning message displayed.
Reports
There are two different ways in which the SLO and CILO data in the CLT can be interpreted for the purpose of producing reports. The method used is determined by the 'Treat the SLO and CILO columns as independent lists' checkbox:
- if it is ticked on (the default), the marks available are divided evenly between whatever SLOs are listed and between whatever CILOs are listed; if no SLOs are listed, the marks available are reported as 'unallocated' SLOs; similarly for CILOs
- if it is unticked, the SLO and CILO appearing on the same row are treated as linked; thus a row may have both an SLO and CILO, or just a CILO or just an SLO; in the latter case, the blank entry is reported as 'unallocated'.
For example, 10 percentage marks are assigned to a component of an assessment task whose SLO and CILO contributions are recorded in the following way:

- If the checkbox is ticked on, the report will show: for SLOs a 10% contribution to SLO 1, and for CILOs a 5% contribution to CILO 3 and a 5% contribution to CILO 5 (note: there is a validation check to ensure that the SLOs and CILOs are listed without blanks from the top row).
- If the checkbox is not ticked, the report will show: for SLOs a 5% contribution to SLO 1 and 5% unallocated, and for CILOs a 5% contribution to CILO 3 and a 5% contribution to CILO 5.
The criteria linkages table (CLT) can be used to record three different modes of linkage. There is a different validation test depending on which mode you're using.
See also further details and examples about the differences in reporting depending on the linkage mode used and whether the checkbox is ticked on or not.
Mode 1: Assessment task linked to SLOs and/or CILOs (no specified assessment criteria)
If the assessment task as a whole is to be linked to the SLOs and/or CILOs, the 'Criteria' and 'Weight' fields must be left blank. The SLOs should be chosen from the dropdowns in the SLO column, one per row. The CILOs should be chosen from the dropdowns in the CILO column, also one per row, starting from the first row.
When reporting on the relative emphasis given in the subject to specific SLOs and CILOs, the marks in each assessment task are divided equally between all the SLOs listed and equally between all the CILOs listed.
Validation test: validates if there is no data in the 'Criteria' or 'Weight' fields.
Mode 2: Assessment criteria linked to single SLOs and/or CILOs
If weighted assessment criteria are specified, then the criteria and weight must both be entered on a single row of the table. Any SLO and/or CILO that is addressed by a single criteria should be chosen from the dropdowns in that row.
Validation test: validates if each criteria row has data in the 'Criteria' and 'Weight' fields; the total of the 'Weight' fields is 100.
Mode 3: Assessment criteria linked to multiple SLOs and/or CILOs
If multiple SLOs and/or CILOs are addressed by a single criteria, you can use additional rows under the criteria row to list the extra SLOs and/or CILOs. In these additional rows, the 'Criteria' and 'Weight' fields must be left blank.
Validation test: validates if each criteria row has data in the 'Criteria' and 'Weight' fields or no data in the 'Criteria' or 'Weight' fields when either the SLO and/or CILO are filled in (this can never occur in the top row); the total of the 'Weight' fields in the rows with 'Criteria' and 'Weight' data is 100

Table buttons
There are five buttons under the table:
- [Save]: will save and approve the data that has been entered, making it available for use in any publications and it will also appear on the assessment tasks edit screen. It will also affect reports that include the subject (run via CI / Graduate Attributes). The [Save] button is active only when the data validates; there is a different validation test depending on which mode you're using, as follows:
- Mode 1: the data will validate when none of the 'Criteria' or 'Weight' fields are filled in
- Mode 2: the data will validate when each criteria row has data in the 'Criteria' and 'Weight' fields and the total of the 'Weight' fields is 100
- Mode 3: the data will validate when: (i) each criteria row has data in the 'Criteria' and 'Weight' fields or no data in the 'Criteria' or 'Weight' fields when either the SLO and/or CILO are filled in (this can never occur in the top row), and (ii) the total of the 'Weight' fields in the rows with 'Criteria' and 'Weight' data is 100.
- [Hold without update]: will hold the data that has been entered, but it will not be available for use in any publications, nor will it appear on the assessment task edit screen or in reports. This allows users to populate the table in stages. When [Hold without update] has been clicked, a warning message will be displayed on the assessment tasks edit screen: 'Warning: Recent edits to the criteria have been held for review but are not yet saved.'
- [Auto-fill weight]: will automatically fill in the data in the 'Weight (%)' column for each of the assessment criteria with the same number, i.e. 100 divided by the number of criteria.
- [Add row]: adds an additional row to the criteria linkages table; there is no limit to the number of rows that can be added.
- [Go back to edit assessment task #]: will take the user back to the assessment task edit screen.
Display in subject outline PDFs
If the criteria linkages function is NOT being used, assessment criteria data can instead be added to the 'Assessment criteria' field in each assessment task.
If the criteria linkages function is being used, the 'Assessment criteria' field can be left blank or it can contain data that introduces/explains the criteria linkages table.
If there is data in the 'Assessment criteria' field it will appear above the 'Criteria linkages' table (if any) in the subject outline PDF. The 'Assessment criteria' field should therefore not duplicate data held in the criteria linkages table. The 'Assessment criteria' field and the criteria linkages table are not editable by subject coordinators (changes can be requested via the online workflow process).
If the CLT is included in the subject outline PDF, only the 'Criteria', 'Weight', 'SLO' and 'CILO' columns are currently displayed.
How do I get the CLT to display in subject outline PDFs?
There are two options.
- All subjects: A CIS Admin in the APO can change the setting for an entire course area, the default is off, i.e. 'not displayed in subject outline PDFs' (email CIS Admin to request a change to the setting)
- Specific subjects: faculty staff with 'Admin Editor (SO)' as part of their role can manually change the CLT setting for individual assessment tasks:
- In Subject Outlines, go to the Assessment Tasks tab, choose a task, e.g. 'Edit 1'
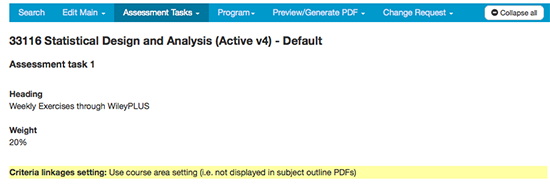
- The 'Criteria linkages setting' displays the current setting for the assessment task:
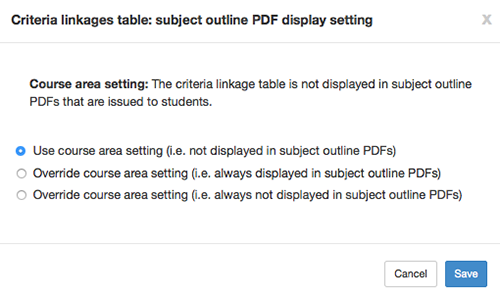
- Use course area setting (i.e. not displayed in subject outline PDFs): this means that the global setting is switched off, and no CLTs will be displayed in any subject outline PDFs unless there is a manual override in a specific assessment task)
- Use course area setting (i.e. displayed in subject outline PDFs): this means that the global setting is switched on, and all CLTs will be displayed in all subject outline PDFs unless there is a manual override in a specific assessment task)
- Override course area setting (i.e. always displayed in subject outline PDFs): this means that the CLT for the assessment task will always be displayed in the subject outline PDF; further changes to the global setting will have no impact on this assessment task)
- Override course area setting (i.e. always not displayed in subject outline PDFs): this means that the CLT for the assessment task will always be displayed in the subject outline PDF; further changes to the global setting will have no impact on this assessment task
- Override the setting for a specific assessment task by hovering your mouse over the setting, it will be highlighted in yellow, and click. A setting override dialogue box will open. Choose either of the override options.
Heading, Type, Groupwork, Weight (%), Reordering
To amend the Heading, Type, Groupwork, Weight or to reorder the assessment tasks, go to the Assessment Tasks tab, and choose 'Manage tasks'.
Objectives
Data to be displayed under the 'Objectives' heading is automatically drawn from data held in the task's 'Criteria linkages' table. Additionally, there are two lead-in sentences that can also be displayed under the 'Objectives' heading. Users with 'Editor (CI)' as part of their role can edit the 'Assessment task SLO lead-in sentence' (e.g. 'This task addresses the following subject learning objectives:') and 'Assessment task CILO lead-in sentence' (e.g. 'This task contributes to the development of the following course intended learning outcomes:') fields via CI / Course Area.
- If there is SLO data held in the criteria linkages table and there is data in the 'Assessment task SLO lead-in sentence', this data will appear under 'Assessment task #', 'Objectives'. If the 'Assessment task SLO lead-in sentence' is left blank, the SLO codes will still be displayed, but without a lead-in sentence.
- If there is CILO data held in the criteria linkages table and there is data in the 'Assessment task CILO lead-in sentence', this data will appear under 'Assessment task #', 'Objectives', directly below the SLO data. If the 'Assessment task CILO lead-in sentence' is left blank, the CILO data will NOT be displayed.
- If there is CILO data held in the criteria linkages table but the 'Assessment task CILO lead-in sentence' is left blank, the CILO data will NOT be displayed.
Copy tasks
You can copy all assessment task data from another subject into the one you're working on by choosing the 'Copy tasks' option on the Assessment Tasks tab dropdown.
- Log in to Subject Outlines
- Go to the subject/instance
- Choose the Assessment Tasks tab, and click 'Copy tasks'
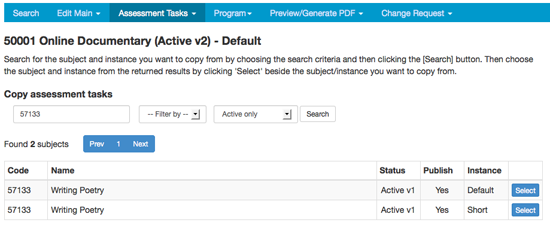
Search for the subject you want to copy by choosing the search criteria and clicking the [Next] button. Then choose the subject from the returned results by clicking 'Select' beside the subject you want to copy from. Note: You can only copy from a subject that you have access to. Contact the APO for assistance with copying from other subjects.
You'll be asked to confirm the copy.
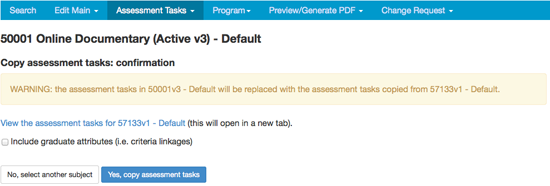
When copying from a previous version of a subject, the checkbox 'Include graduate attributes (i.e. criteria linkages)' will be ticked on by default.
Click the [Yes, copy assessment tasks] button to finish the process, or 'No, select another subject'.
Outcome statistics
- Log in to Subject Outlines
- Go to the subject/instance
- Choose the Assessment Tasks tab, and click 'Outcome statistics'.
Five reports are currently available, displayed as pie charts based on the data held in the criteria linkage tables:
- The assessment task pie charts show the breakdown of tasks and the criteria weighting within those tasks:
- Marked assessment tasks ('Marked tasks' tab) (this shows only the assessment tasks that are ticked on for 'Display' on the Manage tasks screen)
- All assessment tasks ('All tasks' tab) (this pie chart may be the same as 'Marked assessment tasks' pie chart if all existing tasks are ticked on)
- Subject learning objectives ('Objectives' tab): shows the percentage weighting of SLOs across all combined tasks
- Course intended learning outcomes ('CILOs' tab): shows the percentage weighting of CILOs across all combined tasks. If marks are displaying as 'unallocated' in the pie charts, and you do not wish this to occur, ensure the 'Treat the SLO and CILO columns as independent lists' checkbox (located above the CLT on the CLT edit screen) is ticked on. Otherwise the percentage of marks with no associated CILO are reported as 'unallocated'.
- Graduate attributes ('GAs' tab): shows the percentage weighting of GAs across all combined tasks